Posts

Showing posts with the label Stash Busting

Creating Multiples - All You Need is Love & More Coffee
Image
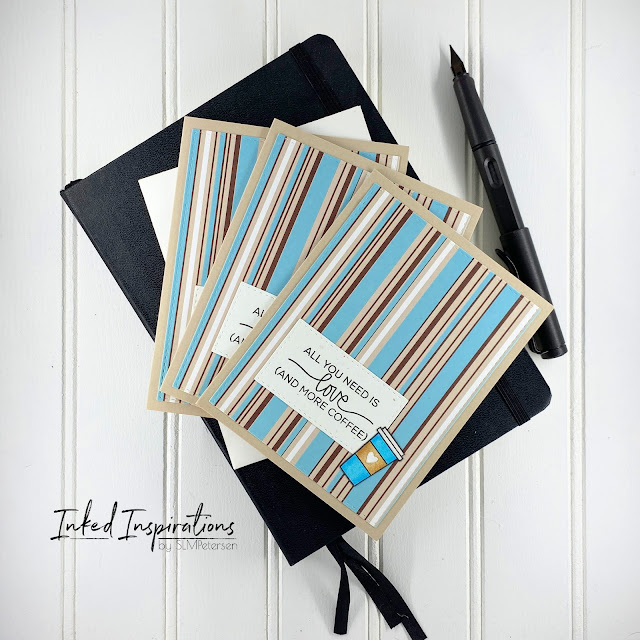
Do you create in singles or multiples?  I do both.  Multiples can be anything from two to six or more.  When I create multiples I often create them with patterned paper.  This is determined by how much of a specific pattern I have, it dictates how many of a card design I can create.   For today's cards, I had enough striped paper to create three cards.  I let the paper dictate the color palette for the card designs.  When I pulled these stripes from the basket I felt a coffee shop vibe, so coffee cards they became.   These stripes are bold and can carry a card on their own, so I needed a bold sentiment and a little embellishment to keep them clean and simple.  I pulled a sentiment and coffee cup from the Technique Tuesday Perk Up stamp set.  I used my favorite set of stitched rectangle dies to cut both the pattern paper and sentiment block.   I used my Copics to color my coffee cups to match the patterned paper. ...
Thanks Trio - Using Die Cutting Diva’s CC Sketch #56

Image
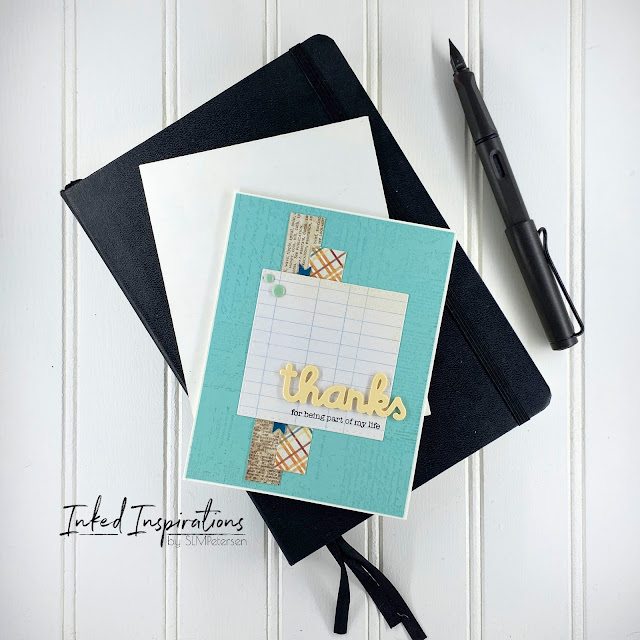
Today’s trio of cards were created with pattern paper scraps and a few die-cuts from my stash. For a while, I subscribed to the theory that if I cut a bunch of die cuts at once I would have them ready to use.  The problem with this is that I began storing them and never using them. As a general rule whatever I already had cut was the wrong color for the card I wanted it on. As a result, I would cut a new one and never use the ones I had pre-cut in my stash.  Now I’m in use it up and quit storing mode. For these cards, I began with Die Cutting Divia's CC Sketch #56 from January 2017 and collected a few strips of patterned paper from my scrap stash. For each card, I selected patterns that worked well together and then found a solid color to fit the color palette for my card panel.  I stamped the solid panel with the Prima Iron Orchard Texture stamp using VersaMark Ink for a tone-on-tone effect.  Once stamped, the panel was added to a white card base. I layered strips o...

Scrap Busting - Holiday Tags

Image
If you're like me, then you have a stash of scraps. Scraps in all sizes, shapes, colors, and especially patterns.  I'm terrible about hanging onto even the smallest of patterned paper scraps.  So today, we're talking about making tags for the holidays.  I have six ideas for tags today, all from scraps in my stash.  I started this project by pulling my file of Christmas and Winter paper scraps.  To fill in a few of the gaps I added patterned paper that matched the color scheme for each set of tags.   My goal was to use only scraps for these tags.  I pulled some of my tag dies and began cutting my scraps, sorting them into color schemes as I went.  I also cut enough white to back each tag.  I stamped the back of each tag "to" and "from" and added sting to each to finish them. Gingerbread men seem to be synonymous with Christmas, so I couldn't help but make a set of tags with them.  For the tags, I used the Pink Fresh Studio Stiched ...

Freshly Made Sketch #197 - Trio of Butterfly Cards

Image
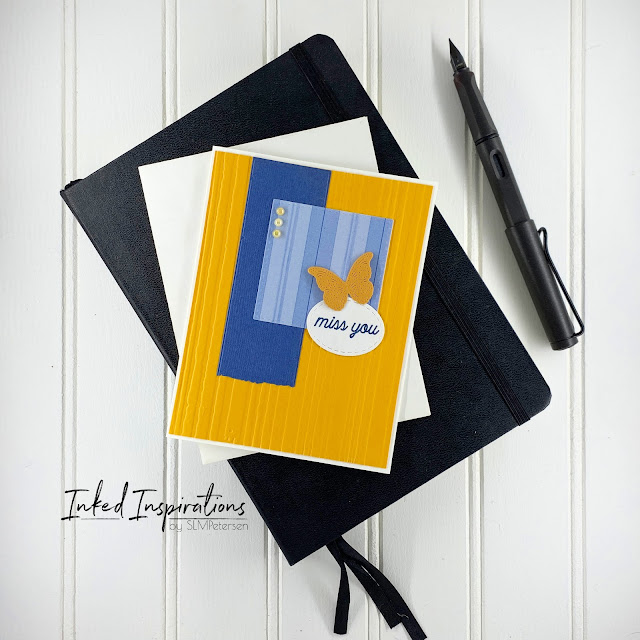
These cards are from a few weeks ago when I was focused on combining the use of card sketches with my scrap stash.  For these three cards, I used Freshly Made Sketch #197 and a few elements from my embellishment stash. For this first card, I worked with a complementary color palette of blues and yellow oranges.  I started by running the yellow-orange card stock through an older Tim Holtz Texture Fades embossing folder called Stripes and adhered it to a white card base. Then I began laying my elements, starting with a banner of textured dark blue that I cut using the Homenty Bee Stamp Banner builder dies.  Layer three is a square cut using some older patterned paper and the Art Impressions Stitched Squares dies.   I added the sentiment using a stitched oval cut with Simon Says Stamps stitched oval dies and stamped “miss you” with a stamp set from My Favorite Things.  To complete the card I added a butterfly cut from a dark shade of yellow-orange cardstock u...

Stitching - Just Because Frog

Image
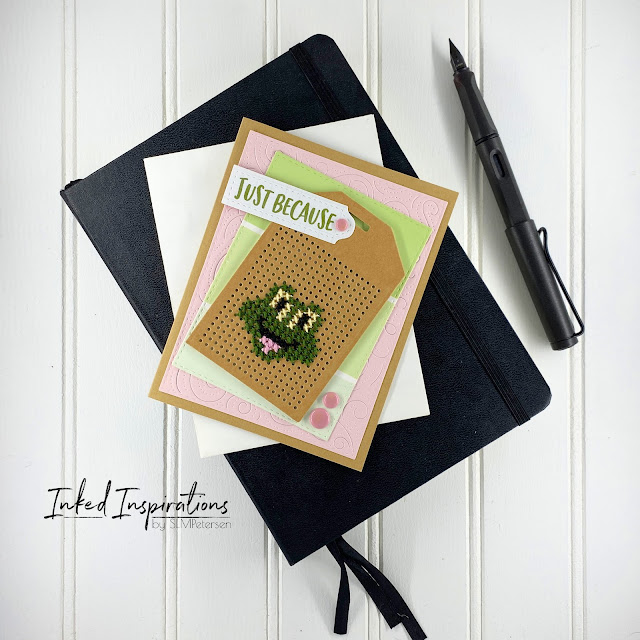
Sticking on cards has been a way for me to combine my past hobby of embroidery with my passion for card making.  I usually stitch when we travel to "town," which is about a two-hour drive.  Living in a small town in rural Alaska, means we have to travel for some things like doctor appointments and a larger selection of groceries.   With this card, I've also tied in another little thing I like to collect, paint chips.  If the paint chip is a head-scratcher let me explain.  I'm an artist first and foremost and I love the color.  I will seek it out anywhere and all the paint chips in a hardware store are like candy to me.  I wish I could remember where I learned you could use a white plastic eraser to remove the text on paint chips, but that was a game-changer for me!  Now I could use them like any other paper in my card-making.  I started this card with the happy frog face and selected a color palette of pink and green to build the card....

Using Patterned Paper to Build a Scene - Altenew Comfy Couch

Image
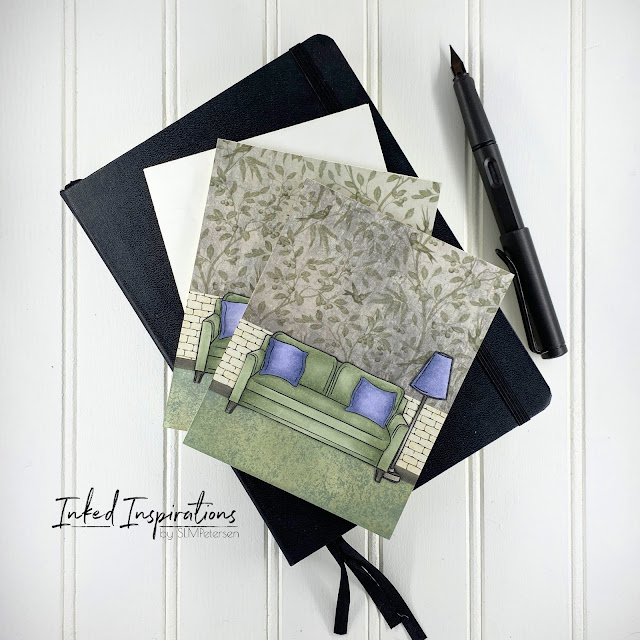
I warned you that there'd be more cute furniture cards. Today, I wanted to share some ideas for using patterned paper to build fun scene cards.  This super couch from Altenew required a fun scene, so I built two options.   For the green couch, I pulled some vintage-looking patterned paper with small print from my stash for the wallpaper and had a 6x6 sheet of small bricks that I cut into enough strips to get four cards.  I used Copics to color my couch in a shade of green to match the carpet, with some blue-violet accent pillows and lamp.  Once colored I fussy cut the couch and lamp for the scene.   Time to build the scene.  I ink-blended Distress Oxide in Ice Spruce across the bottom of a white panel.  I used a texture stamp with Stormy Sky and Pumice Stone Distress Ink to create a carpet effect.  I cut the patterned paper I chose for the wallpaper in half for two cards and added it to the top of the card.  Then I added the strip...

Learning to Use Card Sketches

Image
I've drawn my own sketches off and on over the years, very often to get an idea out of my head when I'm not in the studio to create.  I've never sought out card sketches, nor have I actually used them to build my cards, other than my own of course. Then a few weeks ago my Bestie over at By Grace Everett and I were talking about patterned paper and getting more than one or two designs from some of our patterned paper.  Which got my wheels turning.  I was trying to think of where we could get more inspiration to use our patterned paper, then it hit me.  We needed to watch a few of Kristie Marcotte's videos .   Fast forward to a couple of days ago when I was sipping my morning coffee and seeking inspiration.  I clicked on one of Kristie's older videos where she showed how to use one 6x6 paper pad to make 34 cards .  This is exactly what we needed to jump-start our patterned paper use.  She took one double-sided paper pad and eight card sketches...

5 Take Aways During No Spend October

Image
At the end of September, By Grace Everett and I were talking about all of the product we had purchased and how much stuff we had from previous hauls that we had yet to use.  Then I proposed a no spend October and my bestie was all in.  Before I continue onto what I learned so far, let me state that we've done this before, but this was the first time we had a zero tolerance for buying anything.  Let's talk about what I learned about my crafting self. Take Away #1 - You will use what you have if you stay out of the stores and stop filling shopping carts. Yes, that seems obvious, but I'm talking about the things you bought and tucked in a container and forgot about.  Those enamel dots, wood embellishments, fancy florals, washi tapes, etc.  I've been using up the impulse buys that are stashed in my studio and it feels good.  Take Away #2 - Inspiration will come from other places.  I've recently gotten hooked on using card sketches.  Yes, I'm probab...

Shop Your Stash - Patterned Paper and Large Words

Image
For this week's Shop Your Stash you'll need patterned paper, a large word die, and a large shape die.  We'll be building a clean and simple layered card.  The goal is to shop your stash, but as always I've provided shopping links below the post. If you've been making as long as I have you probably had a stash of patterned paper somewhere that is collecting dust. I've been working on cutting mine into card panels for future projects.  When the creative block hits I pull a stack of 12x12 paper and cut it down.  Often times the pattern will spark an idea and I'm off to the races.  It's surprising how inspiring this can end up being.   Patterned paper can also be a quick and easy way to create multiples of any clean and simple design.  From every sheet of 12x12, I can get six, 4 x 5 1/4 inch card panels.  This means I can easily make six of the same card design.  If I love the pattern, I  opt for a card design that is clean and simple a...

Easter Card Stash Busters

Image
I'm still working on Easter cards, using a few more scrap to create a fee more stash busting card ideas.  If you read Wednesday's post then you know I did cut enough eggs to build 15 cards.   This time around I had a little fun with the eggs.  I "posed" them in a polaroid frame die cut, as if they were in a bit of a family photo.  Stamped a cute sentiment on the bottom of the frame and added "Happy Easter" to the panel before adding it to the card front. For the next card, I created a little banner of eggs.  Alternating plaid eggs and cream colored eggs.  I stamped a little bunny onto each of the cream eggs.  Punch a small hole into the top of each egg, stringing them onto a bit of crochet thread.  I adhered the thread to the back of the panel, then arranged the eggs and glued them in place.  Adding the Happy Easter sentiment to finish the card panel before adhering it to the card base.   One more egg idea was creating a littl...

Easter Eggs - Pattern Paper Scrap Buster

Image
I love cards that help me use up all the fun bits of leftover pattern paper.  Let's face it, we all do it.  We save every tiny scrap of our pattern papers, thinking "I'm sure I can still get something out of this."   I doubled down on these eggs and went to town.  I used a die from Simon Says Stamp , but any egg die or even a small oval would work for these cards.   I was inspired by a couple of pins from Pinterest and set about cutting eggs.  I kind of lost track when cutting my eggs, I ended up cutting enough eggs to create 15 Easter cards.  These were fast and easy, a great card idea for mass production. I pulled any scrap from my stash that was large enough to cut an egg from.  Then the eggs were divided into stacks of four based on colors or patterns that coordinated.   Once I had my eggs all cut I die cut some white pannels.  Next, I laid out my eggs to decided on stamp placement.   After stamping each panel I...

Cards from my Cast-off Basket

Image
Monday, I created eight cards by using some bits out of my basket of cast-offs.  I must confess this idea was inspired by watching one of the many Tim Holtz Demo Videos on YouTube.  In the Sizzix Shaping Kit Demo video , he talked about how we should go in the studio and make bits and elements and then make cards from the parts later.  Tim shared how when he used to sit down and just focus on making one card at a time his cards were, well as he put it lazy.  He also talked about how when he was focused on single card production he often wasn't using all his things in his studio to their full potential.  By trying this method of creation, I ended my day with eight cards.  All from things that I cut for other cards, but never used for various reasons. I even found a stitched tag that was never finished. The nitty-gritty of how I went about making parts and then cards all starts with my basket of cast-offs.  I keep a small white plastic basket tucked unde...

Blue Jays & Cardinals

Image
Can I just say I love this Tim Holtz bird die? This die was a free with purchase at Simon Says Stamp a while back, and I’m honestly not sure there was any other way to get him. I’m so glad I opted to snag this little guy. The first time using this die I opted for traditional Blue Jays and Cardinals for my color palette. I paired them with my chicken wire embossing folder and some fun speech bubbles for greetings.  I cut card panels with the wonky stitched rectangles die from Simon Says. Then I inked the embossing folder with Pumice Stone Distress Oxide ink before running each of the panels through the die cutting machine. This gave me a more realistic wire effect.  Using some speech bubble dies I had in my stash I created some fun little messages to go with these cute birds. I pulled greetings from several stamp sets, giving each bird a different message. I popped all the speech bubbles up on foam tape. These birds were a lot of fun to use and I'll be working with them again i...

All About the Rainbows

Image
I'm gonna blame these creations on my bestie.  She has been sending me photos of her rainbow card creations and I caught the rainbow fever.  I spent one afternoon making these cards with things I already had in my stash.   The first card was the beginning of the rainbow rabbit hole.  I used one of my Simon Says Stamp Stencils and a selection of Distress Inks.  Then I pulled a rainbow sentiment from a retired stamp set and added a few black butterflies.  I really love using black and white elements with rainbows. Card two uses a Crafter's Workshop stencil with the same selection of Distress Inks that I already had on the table.  I'm not sharing specific colors, because it doesn't matter, pick the colors of the rainbow from the inks you have.  Again I added a sentiment and black butterflies, but I added a few little gems to pull the design together. The third and fourth cards have backgrounds created from spritzing the stencil and making a fir...