
How I Use a Card Sketch
Today I thought I'd share a bit of a run-through on what the process looks like when I start an idea with a sketch. Not every idea starts as a sketch, but it should. I find value in getting my design ideas down on paper, no matter how rough the sketch is. To be honest, sketching is a practice I should form into a habit. It would be especially helpful during those times when I’m loaded with ideas and don’t have enough time to create what's floating in my head.
 Card sketches start, usually when I find a design that inspires me, but I want to use different products or a different theme. It can also start with me revisiting one of my older designs with a bit of a plan to refresh something.
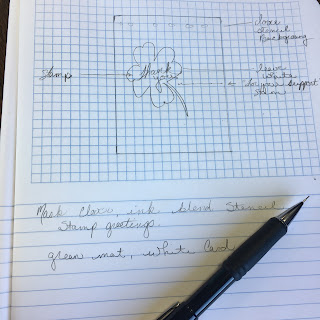
In this example, I was working on some samples for the 4-H thank you card presale I talked about a couple of weeks ago. I wanted to roughly sketch out the clover thank you card before I went to work one morning. Before the idea was lost to the dozens of other thoughts in the day.
When I create a sketch it’s about the general idea, it doesn’t have to be neat and pretty and all drawn out. It just needs to be enough to jog my memory for recall when I can sit down to create it. I include a few notes around the sketch and add additional details in the notes below if needed.
.JPG) When I finally have the time to sit at the studio table I can pull the sketch and go to work. For this card, I actually cut a couple of different stencils on my Brother Scan and Cut Machine before I started work on the card. This gave me both a stencil and a mask for the card ideas I had sketched out. I used the second stencil I cut, rather than the one pictured here.
When I finally have the time to sit at the studio table I can pull the sketch and go to work. For this card, I actually cut a couple of different stencils on my Brother Scan and Cut Machine before I started work on the card. This gave me both a stencil and a mask for the card ideas I had sketched out. I used the second stencil I cut, rather than the one pictured here.
Side note, I spray my stencils with an easy tack adhesive, which is a repositionable adhesive once it's dry, to hold stencils and masks like this in place on my projects to avoid shifting while I’m ink blending.
This particular card design required both a mask and a stencil. Once the mask was in place I laid the clover pattern stencil over top and began ink blending. The clover pattern stencil is one I purchased for this project.
.jpg) Once all the clover pattern was completely inked, I removed the pattern stencil, leaving the mask in place. The second layer of ink blended over the entire card front, then the mask was removed to reveal the white space. The large thank you was stamped in black ink onto the white clover and the smaller sub sentiment was added below. To complete the card, I die cut the panel with a stitched rectangle die and adhered it to a white card base.
Once all the clover pattern was completely inked, I removed the pattern stencil, leaving the mask in place. The second layer of ink blended over the entire card front, then the mask was removed to reveal the white space. The large thank you was stamped in black ink onto the white clover and the smaller sub sentiment was added below. To complete the card, I die cut the panel with a stitched rectangle die and adhered it to a white card base.
That's the full process from sketch to the finished card when I opt to use a sketch.

In this example, I was working on some samples for the 4-H thank you card presale I talked about a couple of weeks ago. I wanted to roughly sketch out the clover thank you card before I went to work one morning. Before the idea was lost to the dozens of other thoughts in the day.
When I create a sketch it’s about the general idea, it doesn’t have to be neat and pretty and all drawn out. It just needs to be enough to jog my memory for recall when I can sit down to create it. I include a few notes around the sketch and add additional details in the notes below if needed.
.JPG)
Side note, I spray my stencils with an easy tack adhesive, which is a repositionable adhesive once it's dry, to hold stencils and masks like this in place on my projects to avoid shifting while I’m ink blending.
This particular card design required both a mask and a stencil. Once the mask was in place I laid the clover pattern stencil over top and began ink blending. The clover pattern stencil is one I purchased for this project.
.jpg)
That's the full process from sketch to the finished card when I opt to use a sketch.
Comments
Post a Comment